

Abandoned Temple is a location in Lords of the Fallen. This area is part of the Rhogar Realm, and is accessed via the Pathway. Harkyn will visit the Abandoned.
General Information

- Previous Area: Keystone Monastery
- Next Area: Catacombs
- Sublocations:
Audiologs
- Dimensions IV: Rifts
NPCs in the area
Bosses
Items
- Small sealed rune
- Energy Shard
- Hot Blood Armor Set
- Lightning Resistance Shard
- Locked chest that requires rune: Attribute Point Shard and the Live Elements Armor Set (increases elemental defense)
- Magic Energy Shard x 2
- Gauntlet
- Chest reward: Symmetry Armor Set
- Chest reward: Fate
- Chest reward: Prejudice staff and a Small Sealed Rune
- Yetka's Dagger
- Chest reward: Hot Blood Wrist and Legs and Pain
- Spike and a Magic Energy Shard
- Catacomb's Key (complete Yetka's Quest)
- Commander Shield - Boss Drop.
- Eagle's Wings - Tower Shield. Near N10. on the map, locked door.
- Hope Hammer - Upon return from Abandoned Temple, atop the Burnt Watchtower
- Guard's Greatsword - Upon return from Abandoned Temple, dropping from ledge at Burnt Tower
Enemies
Abandoned Temple Walkthrough
Walkthrough
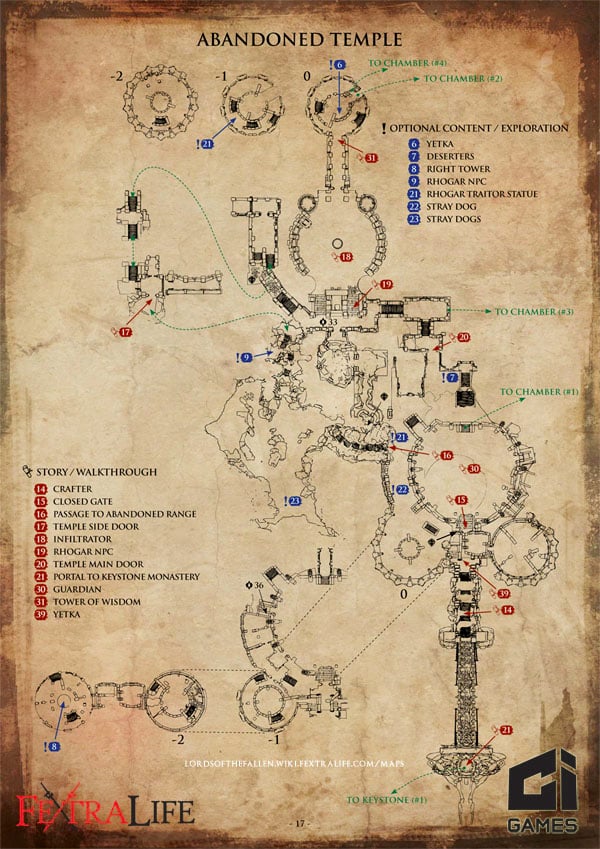
Even though your quest is to reach Antanas, you can't ensure his safety with Rhogar Lords still spawning in the Keystone Monastery. You have to destroy whatever they are using traverse dimensions before you can meet Antanas. You enter the Rhogar Realm and will meet a number of new, interesting species. The Crafter is a being that evolved and learned how to travel between dimensions. You will also get to learn that not all Rhogar are built to fight, but it seems all of them want to. After entering the Temple, straight ahead from the entrance, you will finally meet the mysterious Crafter  14. continuing further on will lead you towards a closed gate 15 . To open it, explore the towers on both sides and find a hidden lever in each one of these. Pulling both levers opens the gate into The Holy Flame, but for now, just go through it and upstairs onto The Panorama, from where you can find a passage down to the Abandoned Range 16 below. Entering the Temple interior by the side door 17 will lead you to stairs just before the Infiltrator 18. Defeating the boss will give you the opportunity to talk to the side quest Rhogar NPC 19 - the only demon in the game that can actually communicate... kind of. You will have a choice whether you want to save the deserters or not. Obviously, your decision will affect the outcome of the game. Past the Rhogar NPC is the door and path leading to the front exit from Temple interior 20 (and a bunch of deserters outside with their own side quest). Your goal now is to head back to the Keystone Monastery through the portal at the end of The Bridge Between Dimensions 21 that you entered through.
Back at the Monastery, you can finally head towards the main part of the Citadel. A dying soldier will point you to a secret entrance through the Catacombs. The closest entrance is the gate marked with Three-Headed-Snake at the Cemetery 22 (on the Monastery map)
Second Visit to the Temple
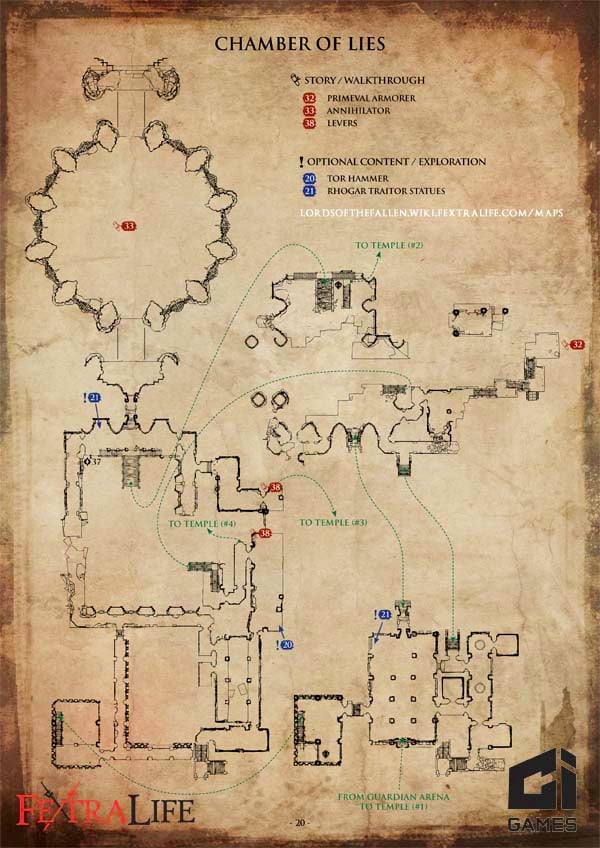
The Abandoned Temple has changed since your last visit. And the real nest of Rhogar lies even deeper. When you decide to enter the Abandoned Temple, Yetka 39 will ask you to follow her. At this point, you can either proceed to the Flame arena and fight the Guardian boss 30 or follow Yetka to the arena where you fought The Infiltrator boss, where you will gain access to a tower outside the arena 31. Each of these two paths will give you access to a part of the Chamber of Lies - use the Gauntlet to open the seal. You will have to explore both parts of the Chamber to pull two levers 38 that will pave the way to the Primeval Armorer 32, but the order is up to you. Once you reach the Primeval, Yetka's quest will reach its conclusion and you will be allowed to proceed to the last Boss - Annihilator 33.
When you defeat The Annihilator, you will now be able to face Adyr - the god. After your encounter, Kaslo will appear and explain that something's happening in Keystone. You will be sent inside the Citadel. --> Continue to Keystone Citadel
Item Walkthrough
After you meet the crafter, walk forward towards Yetka. After your conversation with her, head left and open a chest in the Western Antechamber that contains Wisdom Armor Set Chest and Helmet. Head down the stairs and take a left, defeat the demon dog and notice the closed gate. You'll come back here later. Now continue the way you came from and open another locked door, you will be attacked by an enemy throwing firebombs. Defeat it and find another set of stairs leading up, with a crossbow enemy. After the enemy is dead, scout this level of the building to find a Poison Resistance Shard. You will come back here once you have obtained the Small Western Antechamber Key and can unlock this door for the Ancient Plate, the legs of the Cunning Armor Set and an Attribute Point Shard. Back in the bottom level, a gate can be opened to exit the room. The following room contains a locked chest, that needs the Blacksmith's Chest Key to unlock. Pull the lever and head back to Yetka's position and towards the Eastern Antechamber.
Jump across the gap directly in front of the entrance to obtain a Magic Energy Shard. Drop down and defeat the three enemies awaiting you. Find stairs leading up and look for an indented part of the floor that holds an Energy Shard. This same room allows you to jump across a gap towards a room with a rogue enemy and a chest, that contains the Lost Pike. You can now head down to the lowest floor and find a side room with two enemies and another lever for you to pull and the Ancient Plate Quest Item. You can now return to the checkpoint shard, and you will find Yetka is gone. You can now access the Heart of Flame and fight your first Tyrant. As soon as you enter the open area look to your left and destroy the pot, and pick up the Tyrant Heart. If you do not do this, the enemy will not die. Defeating the Tyrant will grant you the Small Western Antechamber Key. (See above)
Eternal Flame
Proceeding through the Eternal Flame, go right to fight a Demon Dog and pick up an Empty Bottle. After dealing with the remaining two enemies, head up the ramp.
The Panorama
Go right to pick up a Small Sealed Rune, then left past the Last Traitor Statue. There will be some enemies and then another open circle area (similar to Eternal Flame). Kill the 2 difficult enemies there and open the chest on the right side containing Lurker Thrust. Also grab the lore, Rifts, on the left. Go down the stairs and kill the shield guy and open the 2 shortcuts and face the Wizard, who drops Two-Horned Shield, if you feel up to it and grab the Ancient Plate and open the sealed rune door with an Empty Bottle in the chest inside.
Ancient Caves
Head back to the Last Traitor Statue and head down the snowy pathway to its left. Kill the enemy at the bottom and go right to the checkpoint. Past the checkpoint, there is a dark cave with many pitfalls. You will find a Fire Resistance Shard if you go right, followed by a Spider. Behind the Spider is an Ancient Plate. To the left is a baby Spider and a large one on the ceiling. After killing them, loot the staff Conceit from a chest on the left. Go back the way you came, but hug the right wall of the pitfall cave and head to the back towards the chest holding Griffin Legs, Spellpoint Shard and Poison Resistance Shard.
Abandoned Range
Head back to the checkpoint and go straight and then left kill the enemies there (watch out as there are some in the bushes) and pick up the Magic Energy Shard and open the chest to receive Wisdom Legs, Wrist and the greataxe: Swing. Head back the way you came and head up to the ridge on the left (be careful, there are 3 Hounds and 1 Hound Master). Grab the Energy Shard and the lore, My Treasure, behind where the Hounds are. Keep heading along the ridge and kill the 2 archers. Open the chest to acquire the Griffin Head and Wrist. Break the Urn and grab the Tyrant Heart, then head down to fight the Tyrant below. Past the Tyrant is an Energy Shard on the ground to the right and on the cliff to the left, if you look carefully there is another Energy Shard. Keep heading up the path and open the door with the switch.
Sacred Hallways
Kill the enemy directly ahead and if you are feeling up to it, kill the large Rhogar to the right and use the pressure plate near the locked chest (opens with the Blacksmith's Chest Key) at the end of the hallway to open an iron gate near where you first came in. Inside that room is a chest containing the Cunning Head, Chest and Wrist. Drop down and collect the Ancient Plate. Go down the stairs and face the Tyrant, his Tyrant Heart is behind him to the left (be careful not to aggro the other Rhogar to your left). Use the lever to the right of the Heart to open the door ahead. There are two Spiders inside and the lore, Cruel Species and a chest containing Griffin Chest, Ghost Merge Shard and Poison Resistance Shard. Head back through the door and down to the right. Kill the 2 Rhogar there and grab the checkpoint. Past that is Infiltrator.
The Portal
Once inside The Portal, you will fight the Infiltrator Lord. Upon defeating him you will acquire the Crystal of the Traveler. Uras and Sealed Big Rune will be laying next to Yetka on the ground. If you give Yetka your Ancient Plates she will give you 5 shards (Energy, Magic, Poison, Fire, and Lightning). Head back the way you came and go through the Dimension Portal that is now open (in the Sacred Hallways). There are 3 chests containing: Empty Bottle, Codex, Small Sealed Rune 2x, Magic Energy Shard & Energy Shard.
Sacred Hallways
Head back to The Portal and do an immediate 180 and speak with Crippled Rhogar, who will tell you to bring him 15 Human Skulls in exchange for a shield ( Stance). To the right of Crippled Rhogar is a lever that opens a shortcut to the Ancient Caves. Pull it and head back and to the left of Crippled Rhogar and up the stairs. There will be a Tyrant, whose Heart will be behind a Rhogar Archer up another set of stairs. Kill them, grab the Heart and pull the lever that opens the door leading back to the Panorama.
The Panorama
Immediately after heading through the door you will hear moaning on the left. There are a group of Deserts that will give you xp if you give them a Health Potion and will give you a quest to help clear the path back to the Bridge Between Dimensions. You can kill them to get some weapons ???, but it is difficult. If you help them, they can help you in the Guardian boss fight later on (you need to kill the tree looking Rhogar in the Western Antechamber). There will be a lone Hound near the Last Traitor Statue, if you attack him he will run off (vanish). Head down the snowy path to the left of the statue and all the way to the left. He will be there and you will be ambushed. Defeat the ambush and you will receive the Trinket: The Keep. You can now head back through the Rhogar Portal and are ready to head to the Catacombs.
(Continued at Catacombs)
Return to Abandoned Temple
Bridge Between Dimensions
Things will have changed some since you were last here. Many of the enemies are much stronger. You will notice there is now a Tyrant on the bridge in front of you. Run by him, break the urn, collect the Tyrant Heart and then kill him to get another Small Western Antechamber Key. Press on and kill the Wizard and speak with Yetka by the checkpoint. Head into the Western Antechamber. If you saved the Deserters they will be here and will give you 3 Human Tattoos if you tell them to head out and the Amulet of the Betrayer. Go down the stairs and do an immediate 180 to your left. Unlock the door with the key you just opened, grab the lore, Shards and open the chest to reveal Burden and Eternal Legend Legs and Wrist.
Eternal Flame
Head into the Eternal Flame and fight Guardian. You will receive Firewalker and Big Sealed Rune for defeating him. His Dimension Portal will now open nearby.
Inside is an Infinite Void. In the Infinite Void, head towards the fire and kill the enemies there. There are rune trails on the ground, one goes left and the other right. Go Left and follow the runes, killing the enemies along the way. You will come to 3 chests. If you open them left, right, center they will stay lit. If you open them in any other order, you will be attacked and defeating the enemies will reward you with ??. Head back to the fire. Be careful as more enemies will be there and they are much more powerful. Kill the Tyrant and collect the Tyrant Heart. There will now be a chest here containing Fly and a Magic Energy Shard. Now go the right and follow the runes and kill the enemies in the flame circle. Loot the chest and acquire a Magical Energy Shard. Head back to the fire and loot the chest to find Tribute and an Attribute Point Shard. Leave the Infinite Void and head to the Abandoned Range (past the Last Traitor Statue).
Abandoned Range
Head through the Eternal Flame and Panorama to the Abandoned Range. Once there go straight and to the right (where the Tyrant was that you killed when here earlier). Head up to the stairs and go left on to the cliff side. Crippled Rhogar will be here and you can give him the rest of your skulls. If you do a Wizard and two large shield Rhogar will attack you. After you kill them, kill Crippled Rhogar and acquire the trinket, Leech. Head left up the stairs and into the Sacred Hallways and down to your left and back around to The Portal.
The Portal
Once inside the Portal, speak with Yetka and give her any Ancient Plates you have to gain Spell Point Shard. Shoot the barrier with your Gauntlet and pull the lever. Press on into the Altar Ruins.
Altar Ruins
Kill the Wizard and loot the chest to reveal Demon Assassin Chest or Effect Armor piece or Fallen Chest Armor. Head into the door and kill the Ghost on the right. Head further right and kill the Large Archer and loot the chest next to him to get, Justice. Head into the main room and speak with Yetka and head across the room through the other doorway. Head left and kill the Ghost. Go up the stairs and do a 180. Kill the Ghost and loot The Blacksmith Chest Key from his corpse. There is a pressure plate on the ground that opens the gate at the bottom of the stairs. Inside is a chest containing Nado. Head back the way you just came and head to the right of the next set of stairs. Kill the enemy and loot Demon Assassin Wrist or Effect Armor piece. Past that there is a lore, Runes, and a gate that opens a shortcut. Head back a bit and go up the stairs you just ran past. Kill the Large enemy at the top, pull the lever and loot the sealed rune chest containing Demon Assassin Legs and Head or Effect Armor pieces. Now head back down to Yetka, shoot the seal with your Gauntlet and enter the Chamber of Lies.
(Continued on the Chamber of Lies)
Abandoned Temple Map
Notes & Trivia:
- ????
 Anonymous
Blacksmith's Chest Key from this page is a 404. Update your links.
- Anonymous
I find this part of the walkthrough to be extremely confusing. When it tells you "continued at catacombs it gets even worse. The "ambush"never happened to me, neither did the"tree looking" creature...or even the tyrant with that key. I enjoy this site so much that I've been using it from day one....this kind of scattered information in a game that makes dark souls look like Mario is very uncool.
https://lordsofthefallen.wiki.fextralife.com/Protector
Drops if you kill the guards and human tattoo
0
+10
-1