

Keystone Citadel is a location in Lords of the Fallen. This area is visited twice in the game. The first time is during the tutorial.
General Information

- Starting Location
- Next Area : Keystone Monastery
Audiologs
NPCs in the area
Bosses
Items
- Giant Key
- Empty Bottle
- Energy Shard
- Dimension Portal Chest Rewards:
Enemies
Full Keystone Citadel Tutorial Walkthrough
Story in Lords of the Fallen consists of three layers. The top-line story is conveyed by the dialogues and cutscenes. World information and lore can be mainly learned through audio notes scattered across the game. Additionally, every item in your inventory contains flavor text that further fleshes out the world that surrounds the player.
You play as Harkyn - a convict that has been let out of prison to help fend off the Rhogar invasion. Together with your jailer, Kaslo, you reach the Keystone Monastery, where Antanas, leader of humans, is hiding. You and Kaslo are the only ones who survived your travel to the Monastery.  1 The first enemy that you will face is a Rhogar Marauder - an aggressive type of demon. You can skip the combat and movement basics tutorial if you feel like you don’t need it, but bear in mind that Lords of the Fallen does not feature a “replay tutorial” feature. Next you can either talk to 2 Kaslo upstairs to get some lore insight, or find a door downstairs that leads to the rest of tutorial area - this area is where you need to look for the Giant Key that opens your path further - to the first boss arena. The Giant Key is in the part of tutorial area that’s called Cellars 3 .
First Warden is the first of the Lords - commanders of the Fallen God’s army. Their traversal to the human realm requires vast amounts of energy, therefore their appearance is often accompanied by an explosion. Fighting the first Lord serves as an initiation ritual for Harkyn. You next goal, is the boss - First Warden 4 . Before you enter the arena, you can talk to Kaslo to get your potions refilled. After you have defeated a boss, the way further on, out of the arena is just opposite the door you entered.
Item Walkthrough
- Objective: Find Kaslo. Go up the stairs and to the right to trigger a conversation with Kaslo, who has freed Harkyn from his prison. You can discuss some of the initial game lore such as learning about Antanas. A locked door keeps you from progressing, it needs the Giant Key. You will find an audionote to the right of Kaslo The Guard
- Objective: FInd a Key. Go back down the stairs and through the door on your right. Kill the enemy and proceed right: watch out for the ambush around the corner. Don't go down the stairs yet, instead follow the path to a game tip about stealth and defeat the enemy. Here you will find the audionote The Sick. You may now go down the previous stairs and dispatch the two enemies. Then break the bookshelves to your left to reveal an opening in the wall. Roll through to a secret room with a chest that contains an Empty Bottle. Go back upstairs and through a passage to the next enemy. Behind him, the note Monk Notes awaits you.
A little further ahead, you will find a Dimension Portal. These are used to access special treasure areas after defeating bosses.
To the right of the portal is a set of stairs leading to a more challenging enemy. defeat him (backstabs are very effective) and continue upstairs to loot an Energy Shard. From here, we'll backtrack to where the second audio note was and go down a flight of stairs until you see the Cellars notification. Two enemies will awake to attack you, and you can obtain the Giant Key after dealing with them. - Objective: Return to Kaslo and open the Door. Backtrack to where Kaslo was and open the door.
Defeat the First Warden boss. - Objective: Find Kaslo. "Kaslo is alone and wounded. Find him before it's too late".
You may now approach the checkpoint shard and access the Character Development menu to level up your attributes and magic. You should then return to the Northern Wing and find the Challenge Portal. There are chests in this portal containing: Faithful Disciple trinket, Empty Bottle, Bulwark Shield, Ghost Merge Shard, Magic Energy Shard, Energy Shard and Small Sealed Rune. Beware that the enemies will respawn when you return from your looting, so fight your way back to the checkpoint. - From the checkpoint, make your way down the stairs in the next room. You will come across two doors, one open, the other not. Go through the unlocked door on the right, and collect the items. In the adjoining room, there's a breakable wall. Don't worry about it for now, you'll return here later. Instead, leave via the other door. Now, as you walk down the stairs in front of you, look at the statue in the center of the stairway. You'll see an item floating just behind the statue. Jump to it, and you'll get the Northern Monastery Wing Door Key.
- From here, backtrack all the way to the door that required the Giant Key, and face the stairs, with the doorway on your left. Head to the right of the stairs, and there is a small ledge with a white cloth hanging over it (it may take a little bit of camera movement to see it). Jump to the ledge, and follow the path. Jump the gap when you reach it, and open the door. Inside this room is the Shard of Heroes, which can be used on one of the three statues in the Square of Heroes. It is best to obtain it now, as obtaining it later can be harder as stronger enemies show up later on.
- Once you have the Shard, head back to the stairwell with the statue in the middle, and go all the way to the bottom, and exit through the wooden door to the Monastery
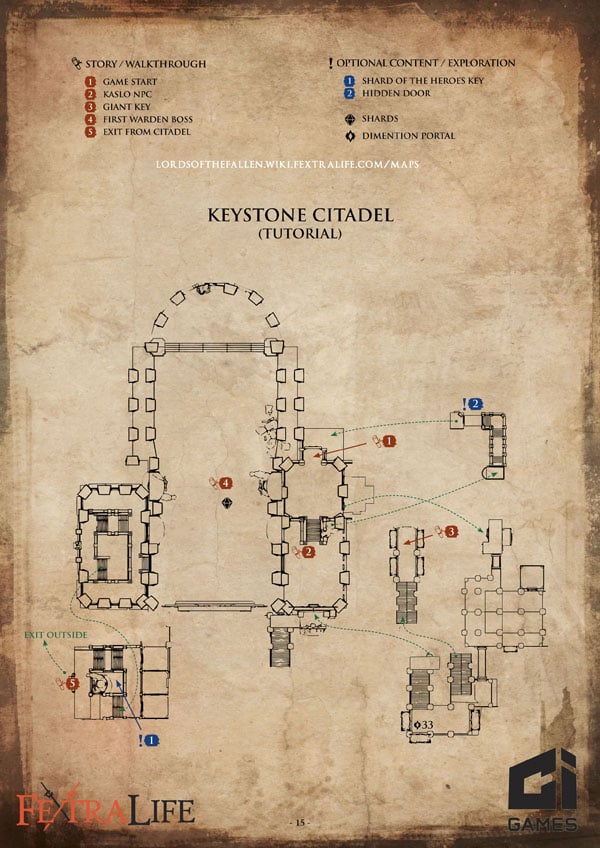
Keystone Citadel Tutorial Map
Notes & Trivia:
- ????