

Keystone Monastery is a location in Lords of the Fallen. This area is a snowy and secluded but well-guarded area, currently overrun by Rhogar
General Information

- Previous Area: Keystone Citadel Tutorial
- Next Area : Abandoned Temple (Rhogar Realm)
- Sublocations:
Audiologs
- Ninth Night
- Gauntlet
- Fancy Looks
- Sixth Night
- Fourth Night
- Guard Logs
- Temple
- Kyle's Grave
- Grim Graves
NPCs in the area
- Injured Monk
- Yetka
- Kaslo
- Dying Soldier (After completing Abandoned Temple) - Drops Human Tattoo
Bosses
Items
- Small sealed rune
- Energy Shard
- Hot Blood Armor Set
- Lightning Resistance Shard
- Locked chest that requires rune: Attribute Point Shard and the Live Elements Armor Set (increases elemental defense)
- Magic Energy Shard x 2
- Gauntlet
- Chest reward: Symmetry Armor Set
- Chest reward: Fate
- Chest reward: Prejudice staff and a Small Sealed Rune
- Yetka's Dagger
- Chest reward: Hot Blood Wrist and Legs and Pain
- Spike and a Magic Energy Shard
- Catacomb's Key (complete Yetka's Quest)
- Commander Shield - Boss Drop.
- Eagle's Wings - Tower Shield. Near N10. on the map, locked door.
- Hope Hammer - Upon return from Abandoned Temple, atop the Burnt Watchtower
- Guard's Greatsword - Upon return from Abandoned Temple, dropping from ledge at Burnt Tower
Enemies
Full Keystone Monastery Walkthrough
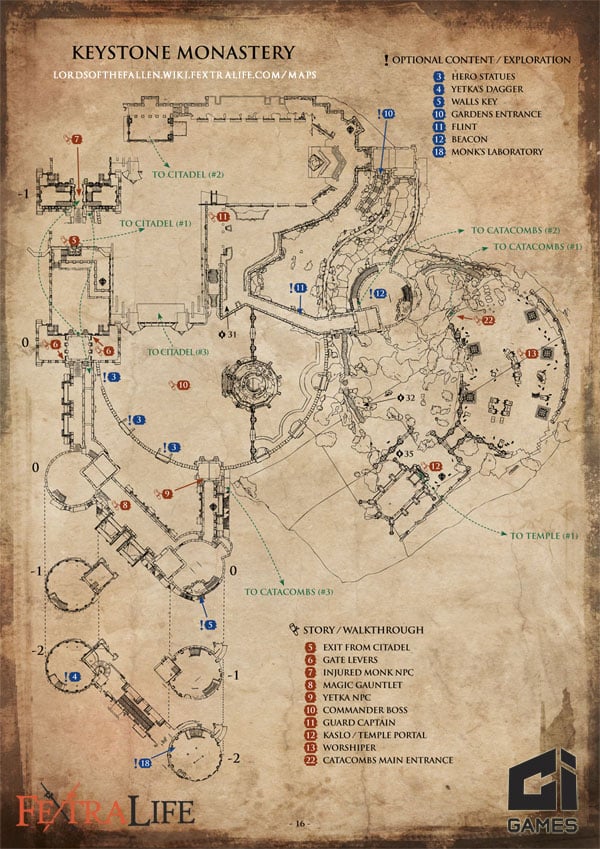
Downstairs you will find an exit from the Keystone Monastery, right onto the snowy exterior of Keystone Monastery  5. Saving the injured monk will let you meet him later in the game. Be mindful of your interactions with NPCs, as they can give you additional quests and change the flow of the game. Out at the Wall Gates, there are two levers that open the gate 6 . There's also a monk inside the gate 7. The first tower just ahead from the gate contains some loot to find, but the main path forward is to the next part of the walls, where you find a Gauntlet 8 . Also, around the place where you found a Gauntlet, look back to open a shortcut if you will want to skip the horde of enemies later. Whether Harkyn likes it or not, he'll be crossing paths with Yetka on several occasions. It's hard to predict where and when she appears and what her motivation really is. When you reach the second tower, going left is both a savepoint before next arena, and Yetka
9 - an NPC with her own side quest. Make sure you use the savepoint after the dialogue with the NPC, unless you wish to backtrack from the Wall Gates if you die. Going right takes you onto and into the tower with all its interesting secrets, shortcuts and challenges. The path past the savepoint, leading through the gate with an NPC standing in it, is where the next boss fight is. Defeating Commander 10 , the second boss, opens the path just opposite the gate where you entered the arena, leading towards the Guard Captain NPC
11 Harkyn and Guard Captain have met before. They have good reasons to dislike each other. The main path from here leads by the Citadel walls, left from the statue with a brave Knight facing a Snake (symbol of death). After reaching the Shard close to the back entrance to the Citadel (closed now), head on through the gate and the path leading down towards the third, Burned Watchtower. Heading on past the Watchtower and further down to the Cemetery Gates leads to finally meeting Kaslo 12 . Defeating the Worshiper at the Cemetery 13 will open your path to the the Abandoned Temple, a place where you will cross into the demon realm. Return to Kaslo after having killed the boss.
Item Walkthrough
Wall Gates
There is a checkpoint to your left. Afterwards, defeat the enemies in the courtyard. and head up each flight of stairs. Two harder enemies await you here and they each guard a lever that will open the gate below. A barrel near the left-side lever hides a small sealed rune.
After opening the gate, you will meet Injured Monk, this NPC has been bitten by a spider and will die if you don't cut of his hand. You can chose to assit him and severe the limb, or not.
- Cutting his hand will reward you with experience and trigger the option to give the monk a health potion for a further 500xp. Doing this ensures you meet him later!.
After the monk, take the door to your right and defeat several enemies. be mindful of the demon spiders in the area. Some of the barrels hide an Energy Shard, and a chest near them holds the Hot Blood Armor Set. The passage below lead to the Northern Wall. Ahead of you, an enemy will reanimate while a crossbow rhogar hits you, so plan your advance. Once you have defeated them, you may enter the Nothern Watchtower. The bottom floor of the tower will have two enemies and a Lightning Resistance Shard, as well as a locked chest that requires a small rune to open. The Chest will give you Attribute Point Shard and the Live Elements Armor Set. Next to the chest is a locked door ((requires Tower Key key)) and ahead of it the audilog Ninth Night. Up the stairs there is another enemy waiting for you, a Magic Energy Shard hidden in a barrel, and the bridge leading to the gate you had opened earlier. Take a right from that first enemy and go towards the glowing object to obtain your Gauntlets. To the left of the item there is an audiolog: Gauntlet. After you have obtained it, two enemies will appear from ahead. One is an aggressive rogue type and the other an archer. Lure one enemy back to dispatch by himself. Then backtrack to the bridge near the Wall Gate and Injured Monk to find a chest amongst a group of three enemies. This chest contains the Symmetry Armor Set
On towards the archer that you left alive at the Main Wall, a small lever on the wall directly behind the Gauntlet opens a shortcut to the North Watchtower. After you have unlocked it, head towards the archer on the South Watchtower and up a set of stairs, towards a checkpoint. As you approach, a cutscene with Yetka will play. You may chose to let her kill or save the monk. After your conversation with her, go back to kill the archer and then down the stairs to find an enemy and the audilog Fancy Looks. Also in this room there is a chest with Lethal Secrets and a Fire Resistance Shard. Note the anvil next to the chest: this will be a blacksmith spot later on, once you have encountered the Crafter. The room behind this holds the Live Elements Chest Armor and a Magic Energy Shard on a chest. On the side of this room, you can drop down to obtain the Tower Key. Down the ramparts, there is a locked door behind which the audiolog Sixth Night is placed. Further ahead, behind an axe Rhogar, a chest holds the axe Fate. You may jump across the small gap and turn left to kill an enemy, jump a gap, and get to a chest with the Prejudice staff and a Small Sealed Rune. Then backtrack to access to the North Watchtower's lower levels. After defeating several enemies in the room, pick up Yetka's Dagger and open a nearby chest for the Hot Blood Wrist and Legs and the Pain Hammer. The stairs up return you to the locked door you had encountered earlier.
Before this area, in the Southern Watchtower there is a room with a Demon Spider. The room has a chest with a Spike and a Magic Energy Shard. If you are too weak to fight the spider, run past it and up the stairs, then you can head back to Yetka to return her dagger and obtain 800xp and the Catacombs Key from her.
You may now enter the Square of Heroes and defeat the Commander boss. Then make your way through the stairs up to the Memorial. Here, the Guard Captain will refuse you entry into the Citadel. and send you to find Kaslo at the Graveyard.
Progress beyond the Guard encounter and take a left outside the building to go through the dimension portal. After completing it, the Bloody Flint is visible in a path ahead marked as 10 on the map and further ahead a dead end with the audionote Fourth Night. Head back towards the portal and find the other way to go, then pick up the audionote Last Night.near a statue. Killing some more enemies will return the objective "Find Kaslo" and place you near the checkpoint of the area marked as number 31 on the map. Look right to the checkpoint and there's audionote Guard Notes - but be mindful of the enemy ambush!. The door next to this is locked, and requires the Southern Trench Key. If you go left there is the Backside Entrance to the Citadel. There are some tough enemies guarding a sealed rune chest. It contains Guardman and an Empty Bottle. There is also a breakable wall to the left of the entrance to the Citadel that contains Blind (you may not be high enough level to kill these enemies at this stage).Continuing forward will take you to the Outer Walls and face you against heavy shield enemies. It is recommended you run-jump to attack them. After two of them, you will find an infested enemy and to his left the entrance to the Burned Tower. At the top of this tower, marked as number 12, is the Beacon, which you can now light for 1000xp. At the bottom of the burned tower, hides a chest with an Empty Bottle, Heavy Shield and Buckler. Use a nearby lever to unlock a shortcut. After unlocking the shortcut, going back to the base of the stairs leading into the circular room from outside, there is a dropdown to another chest containing an Empty Bottle, a skill point shard, and the Guard's Greatsword weapon ( confirm name). The path from the chest holds the audionote Grim Graves, and further down, a drop off leading into the graveyard and the Worshipper fight described below. Continue down (or returning after the fight if chasing secrets) towards the Graveyard and note number 32 on the map, the dimension portal (now closed). Next to it, a chest contains Ghost Merge Shard, Steel Dagger and Steel Sword. There's a checkpoint near you and you can find a Human Skull item hidden next to it. Talk to Kaslo and then face the Worshiper boss.
In the boss arena, you will find 4x Human Skull, the audionotes Temple and Kyle's Grave. Remember to go back to the Dimension Portal of the area (outside after Kaslo, bactracking towards where you met the guard, up some stairs). This portal is a "proving grounds" challenge, and It will have: Back Breaker, Attribute Point Shard and Spell Point Shard
Keystone Monastery Revisited
After killing Beast and doing all of the things there are to in the Citadel you will leave through the door at the bottom of the stairs at the end of the main hall (there is statue near it and a couple of NPCs).
Backside Entrance
Exiting the door, there are two large shield enemies here and a breakable wall on the right (if you didn't earlier on). Continue on and kill the enemies. There will be a sealed rune chest on your right containing Guardman and an Empty Bottle (if you didn't open it earlier on). Head straight past the checkpoint and down towards the Graveyard. The Dimension Portal right outside of it ill now open because Beast is dead. Inside is an Infinite Void that requires you to follow the light around a very dark area. You will die if you don't stay near it. You will be attacked by two Rhogar at one point and then the light will disappear over a chest containing a Poison Resistance Shard. Once done there head into the graveyard, kill the enemies and head into the Catacombs.
(Continued at Catacombs)
Keystone Monastery Map
Notes & Trivia:
- ????
 Anonymous
the chest only contains head and chest. where are the other 2 parts? you open a rune chest and get 2 parts of light armor, and you open normal chest and get set of heavy. what kind of bs is this?
What does N10 mean in the location of the Eagle's Wing shield?
0
+10
-1